أنشئ حسابًا أو سجّل الدخول للانضمام إلى مجتمعك المهني.
Can I even avoid the welcome screen ?

1) Quit Other AppsBefore digging around in the Photoshop preferences, quit any other apps that you are not using. This frees up additional system resources to devote to Photoshop instead.2) Raise the Memory UsageMore memory the better! This gave me a large speed increase: From Photoshop Preferences, click on “Performance” Adjust the slider upward to use more RAM, the more you can spare the merrierA quick note regarding RAM: Computers love RAM, and so does Photoshop. If you’re a frequent Photoshop user or you do anything else that involves significant memory consumption, adding more memory to your computer is a good idea. You can read my review of upgrading a MacBook Pro to8GB RAM if you haven’t already, or find out if you need a RAM upgrade.3) Set Scratch DisksIf you have multiple hard drives, use them for virtual memory: From the Photoshop “Performance” Preferences go to “Scratch Disks” and add your additional hard drivesThis is really only relevant to those users with multiple hard drives, so those of us on laptops generally can ignore this one.4) Adjust the Cache LevelsMost users benefit from a lower cache level: Open the Photoshop Preferences and click on “Performance” Set “Cache Levels” to1Note that if you’re working with large single layered images like a high res digital picture, setting the cache level higher will speed up performance instead. Adjust this setting based on your current usage.5) Never Save Image PreviewsCaching image previews slows things down: From the Photoshop Preferences, click on “File Handling” Set “Image Previews” to ‘Never Save’This reduces Photoshops RAM and CPU usage by avoiding the image previews.

There are few steps to speed up Adobe Photoshop performance. It is meant for those who work with large picture files.
1- Open Photoshop and go to Edit >> Preferences >> Performance.
2- In the pop up window go to Memory usage section and move the slider to anything between85-90 %.
3-Then go to the History and Cache section and change History states to10 and Cache Levels to8.
I hope the interest of all

Say you’ve got this holiday card design going in Photoshop CS5 and it’s ready for the client and your art director to review. In Photoshop, open the CS Live menu and choose Create New Review. You’ll be automatically signed in or asked to hop into Acrobat.com using your Adobe ID. Name the review and set the resolution that you want your reviewers to work with. Your artwork will then be uploaded. By the way, your upload is called a “part,” which is a hint that adding more stuff is expected.

Start a review from inside Photoshop, from the CS Live menu.

Name the review and set viewing quality. Click Upload to send it up to Acrobat.com.
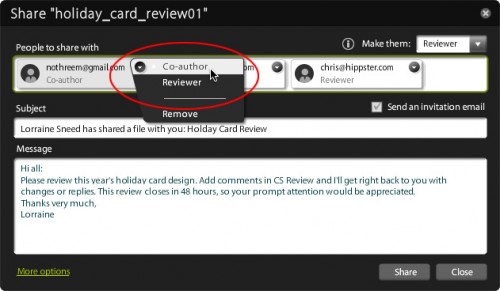
In a browser, get into your review and use Share File to invite your reviewers to join. There are two levels of permission you can assign. A Reviewer has a full set of commenting tools and a Co-author can also invite other reviewers, delete others’ comments, or add content to the review, such as a photo, graphic, or what have you. Reviewers receive your invitation via email with a link to the review, and they’ll log in using an Adobe ID. No fuss — nothing to download.

In the browser-based review window, see Share File options for inviting reviewers.

List reviewers from your address book or enter manually. Assign roles and create an invite.
Reviewers log into your review and use the commenting tools to remark on selected areas. Everyone on the review can see everyone’s remarks immediately, and they can reply to each other’s notes. In the browser interface, it’s easy to navigate around the art, zoom in, and page up and down. Incidentally, from Photoshop the art is uploaded as an image, so your text isn’t live. Reviews created from InDesign CS5 show live text so reviewers can highlight and comment on the words.

See when reviewers are logged in and see comments immediately. They highlight an area and add their notes right there.

Add your own replies for all to see. Everyone can zoom into the artwork, pan around, and view the hot spots.
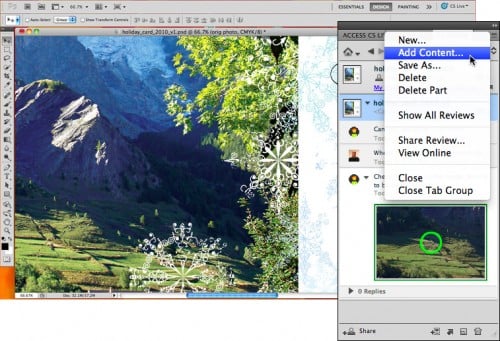
Check back into your project in Photoshop. You can now see all the feedback in the CS Review panel, including little thumbnails of the areas in the artwork with the comments. You can also reply to comments here in Photoshop, copy suggested text, and totally manage the review from the panel — you don’t have to do anything in the browser if you don’t want to.

Inside Photoshop, see all the review activity in the CS Review panel and interact with it here instead of in the browser.

Make the requested changes to your artwork, no other steps necessary.
When you’re ready to show your edits to your reviewers, choose Add Content in the CS Review panel. The new artwork will be uploaded to the same review, becoming another part to the review available to the same set of reviewers for comment. Using the same review means you can see the history of the feedback from the beginning, and see the responses to your changes, all in one place.

Once you’ve made your changes, upload the image to the review using Add Content. It becomes a new part in the same review.

Your updated artwork is available to the same reviewers, no need to send new invitations. Hopefully now you’ll get approval!.
Most of us would rather work with our images than worry about approvals, but to get a project out the door, someone’s got to give you the thumbs up. CS Review seems a whole lot easier than making PDF comps or review websites. And it’s inside Adobe Photoshop CS5, Illustrator CS5, InDesign CS5, and Adobe Premiere Pro CS5. If you use software besides Photoshop, you’ll be interested to know that one review (this is where the “parts” come in) can contain work from those different tools. You can add a logo, a page layout, even a video sequence, all in the same review.


هل تحتاج لمساعدة في كتابة سيرة ذاتية تحتوي على الكلمات الدلالية التي يبحث عنها أصحاب العمل؟